
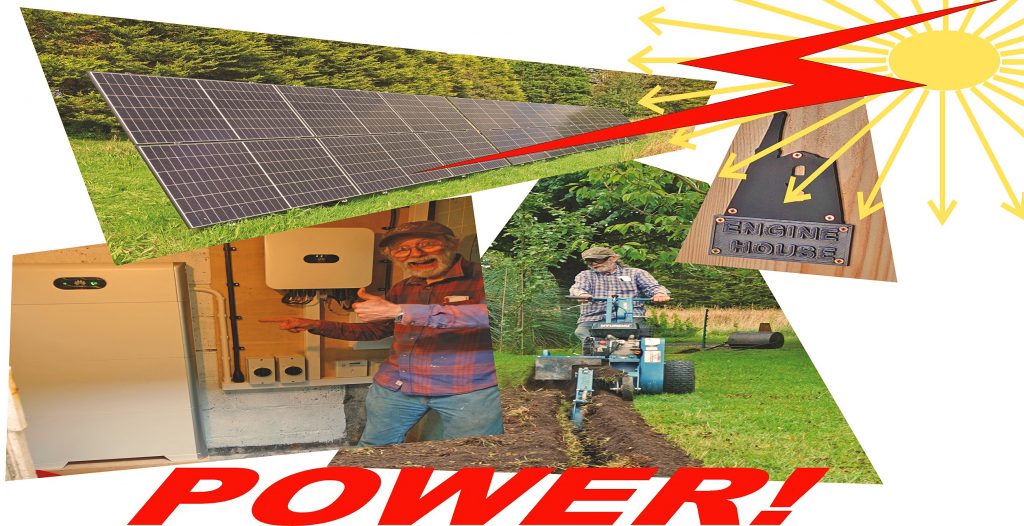
Introduction
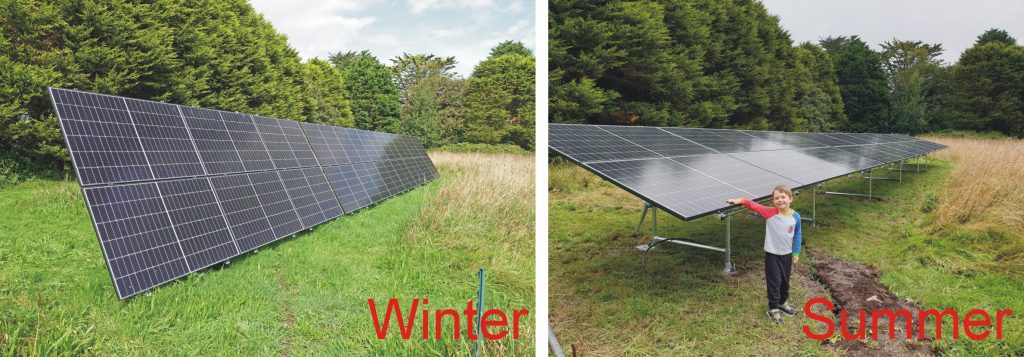
In 2016 we visited a state-of-the art house which featured solar power, (amongst other technologies). Now eight years later, we have at last managed to have solar power installed in our 200 year old Cornish house – or rather in a meadow adjacent. Unfortunately, no part of our roof points in the right unshaded direction (or for that matter is constructionally suitable) for mounting solar panels. Mounting the panels on the ground requires a framework and cabling but it enables the best possible positioning and an opportunity to use a support which can be angled to suit the prevailing season, flatter for the summer (to match the 60 degree sun angle) and more steeply angled for the winter (to match the 20 degree sun angle). This can improve output in certain circumstances by up to 40% it is claimed!
Of course, one of the problems with solar power is that no sun equals no power and that’s a lot of the time! A battery can make up for when the sun don’t shine but is a similar cost to the panels (if it’s big enough to do the job).
Planning permission
Before anything can be installed, annoyingly, you have to get planning permission. (An array of about nine standard panels doesn’t need it but that won’t cut the mustard in terms of useful generation.) Planning permission for this modest proposal costs £600! You have to submit specifications, ground plans and, in our area, an assessment of the impact on the historical industrial landscape.
I drew up the plans on the PC using Google Earth and a Land Registry document as the basis, drawing the details on with an old version of CorelDraw. My wife is involved with the Cornwall Archaeology Society so she was able to supply the impact assessment.
After a bit of toing and froing until they got the information they wanted, there was a further few months while the planning department thought about it. It turns out that they were worried that the development would restrict farming in the area in spite of the fact that the area concerned has been, in effect, a garden and not a farm for at least seventy years and, moreover, the array is so ephemeral, it could be taken down in a morning. Anyway, they eventually allowed it with the proviso that it be removed in forty years. I’ve made a note in my diary!
DIY?
Being a practically minded bloke, I would have loved to have installed the PV system myself. However, if it’s connected to the grid it’s really not possible, regs being what they are. Spoil sports! Off grid could be done but as one would still have to rely on the grid for much of the time, it’s not obvious exactly how it would be done.
Designing a system
To get the best combination of panels and battery, you provide potential suppliers with your annual power consumption (in kWhrs). They tended to come up with similar proposals but, I decided I would go with as much as you can afford! They say you might get your money back in about seven to nine years but that depends on a lot of things – if energy prices get higher or global warming makes for cloudier weather etc. etc. things could change for the better or the worst. Anyway, it’s not just about the money but I’m not going to get into that here!
One component of the nett cost is the feed in tariff (selling back solar energy) which is granted your supplier. Sadly it’s about a quarter of the cost of electricity so it makes sense, as far as possible, to consume the solar energy you generate. Do the washing on a sunny day etc. In the summer we will generate much more than we can use so it will have to be sold back to our supplier. (In the “old days” the feed in tariff was really high like it is in the USA where my son with his 38 panels and no need for a battery, pays nothing overall even with very cold winters and very hot summers with the need for A/C.)
If there is not so much sun, the best bet, I think, is to obtain a low off-peak tariff (ours is between 00.30 and 04.30 hours) and set the system to charge the battery so that this low peak electricity can be used during the day. We have an electric car charging point which currently (winter 2024) seems to allow a good deal on this cheap rate (Octopus Energy). As I write this at 22.30 hours, the battery still has 30% charge even though it has been a bit of a dull January day. So today, at the very least, all our electricity has been consumed at the low off-peak rate.
What a choice of batteries!
Talking of batteries, we eventually had to choose between a Tesla Powerwall and a Huawei model. Who would you prefer to have listening in to your electrical doings (and perhaps tap into your network?), Elon Musk or President Xi? Tesla have a better claimed spec and lifetime guarantee but Huawei are considerably cheaper so, no contest, I’m afraid! Our battery is rated at 15kWhrs, by the way.
Choosing a contractor
How to select a contractor to install the system? Obviously get a number to submit proposals and quotes. They nearly want a picture of the meter cupboard before a visit. Ours is interesting as it still has a number of consumer units with wired fuses as well as several modern with earth leakage protection. It’s a bit of a mess but it works! (and has been tested). Anyway, this put off some suppliers. Others took months to arrange a site visit. Several did make proposals. In the end I chose a company (SunGift) which at one time had been the best supplier according to Which. I also had a long conversation with the owner of the company which supplies the tilting frames (known as the Cornish Rocker) for the panels and actually fixes the panels in place. They seem to work with all the local companies supplying ground-mounted arrays. He gave SunGift a big thumbs up and I went with them.
Our system
The final design uses 20 panels of Trina Vertex S 425W. These are Mono PERC panels which are apparently an improvement on mono-crystalline silicon construction (which, in turn, is an improvement on poly-crystalline construction). They are rated 21.8% efficient which is reasonable compared with the most expensive panels which might be 23%, I believe. We have three modular (stacking) Huawei batteries as mentioned above and a Huawei hybrid inverter.
Cables
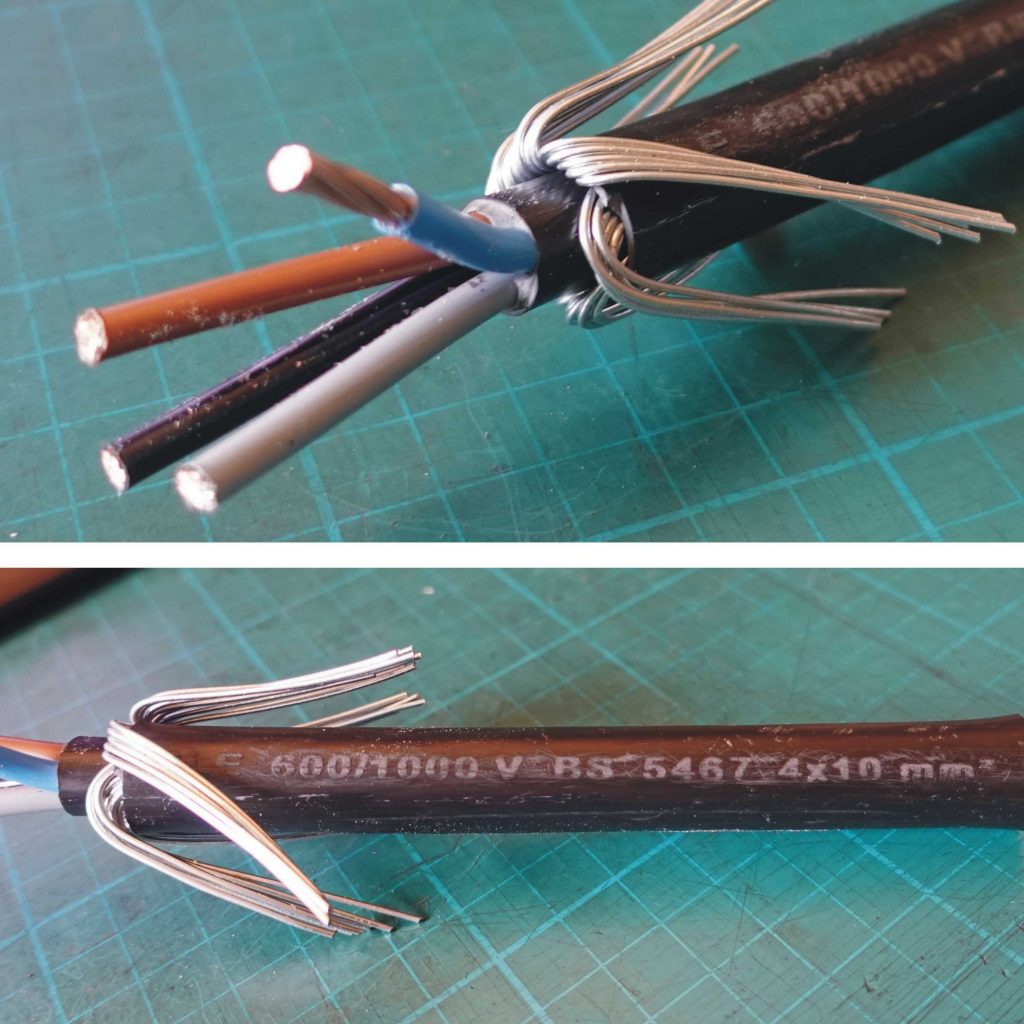
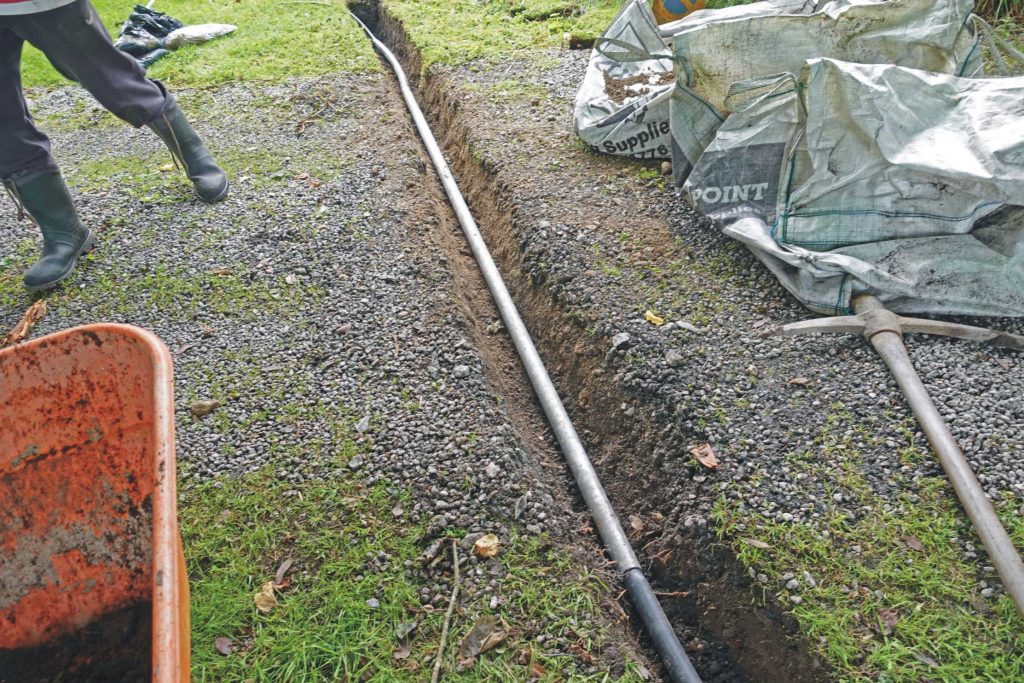
They would do everything except lay the cable which fell to me to organise. The cable, by the way is a 4-core 10mm2 armoured job. The panels are divided in two and are each connected to a separate pair of conductors. I had a quote for about £2000 to dig an approx 200m trench with a JCB which even with the narrowest bucket would have been much wider than necessary and made a right mess of the lawn. Eventually I discovered there was such a thing as a mechanical trenching machine which could be hired for about £80 for a weekend. This machine dug a 500mm trench (and about 150mm wide) as you pulled it along, which in theory was not quite deep enough (600mm deep is needed but since the cable should be on 100mm of sand, it should be 700mm deep, I suppose. Anyway, the cable is tough as old boots, it is just going, in effect, under a lawn and our soil is remarkable free of any stones which could, in time, grind through the cable so I judged it would be OK (it doesn’t get checked, so…)
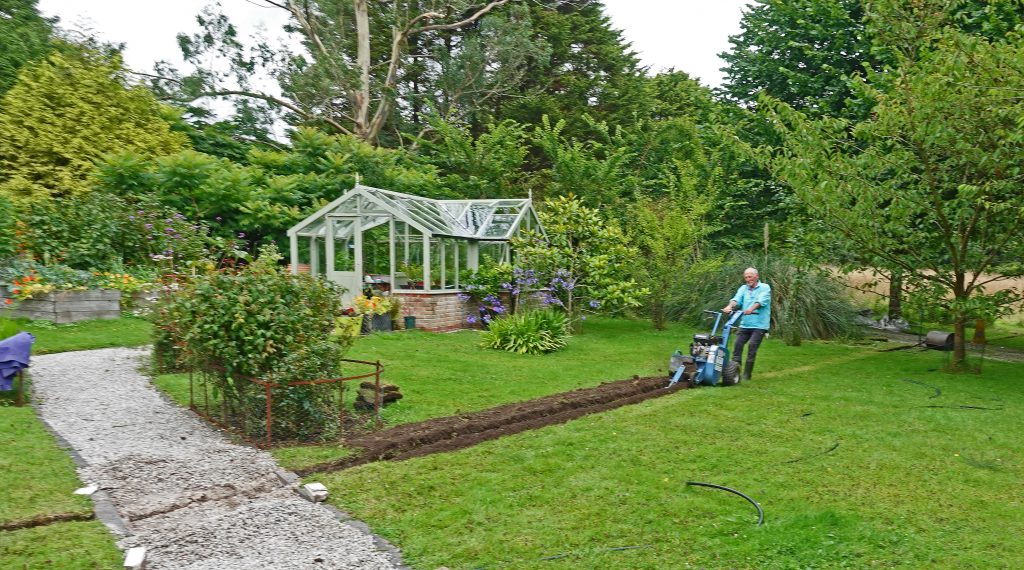
However, it did need to pass under our gravel driveway and so there, I threaded the cable through a piece of scaffolding tubing which should protect it from the effects of cars passing overhead. There was another section where I didn’t want to damage tree roots so I passed the cable through a heavy duty plastic conduit just under the grass. Elsewhere, I surrounded the cable with a bit of sand and put a marker tape on top before filling in the soil and adding a bit of grass seed.
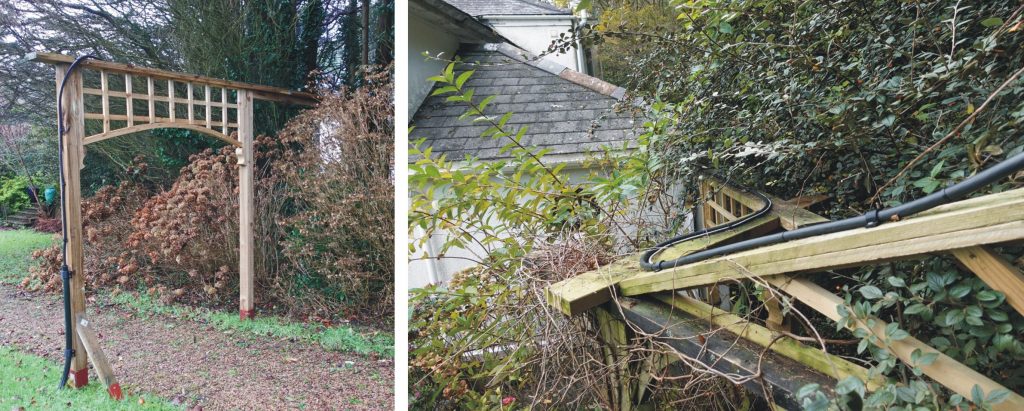
Just near the house there is a change of level and a retaining wall and some concrete paths adjacent to the house itself. Rather than go under, I went over by running the cable over an existing trellis to which I added some extensions to do the job. I have a slight concern about the longevity of such structures. Experience shows that some treated softwood can last twenty five years or more but some only about fifteen. I recommend grounding them in galvanised Metposts rather than setting them in concrete as then their bottoms don’t stay so wet.
Installing the equipment

The battery and the inverter (which converts the hundreds of volts of direct current into alternating current, matching it up to the grid mains in terms of voltage, frequency and phase) take up a fair amount of space. Fortunately we had an old block-built shed adjacent to the location of the meter cupboard (it might have been a toilet when the property was mine offices seventy or more years ago). It needed clearing, tidying up and having a new door fitted but otherwise was just the job.
Later, I rather regretted that the battery and inverter were not in the utility room (where the meter cupboard is located) as they get quite warm. We don’t heat the utility room to save on gas so it would have made it almost the best room in the house in winter (when the sun was shining!) However, there was no space in the utility room without changing a lot of the cupboards and work surfaces that I had only just fitted a couple of years back. So in the shed they went. Although the risk is very tiny, probably best to keep the battery outside the house (similarly, I store my acetylene cylinder in an outside shed and not in the workshop!)
In order to avoid the installers having to drill large holes in the walls and make a big mess, I fitted some ducts (75mm PVC drain pipes between the house and the shed to take the armoured cable and a few other bits and bobs. I also had to provide internet access to the utility room area as, having a 600mm granite wall between it and the router, made it a bit of a dead zone. This required Ethernet through the wall and a Wi-Fi repeater in the meter cupboard.

1. Smart meter. 2. Raspberry Pi (controls boiler temperature Arduino) and Ethernet switch. 3. Boiler timer (uses an Arduino). 4. Old mechanical boiler timer I leave, just in case! (can be plugged in instead of electronic timer). 5. PV main isolation switch and breaker. 6. armoured cables to and from inverter etc. (in the shed). 7. Wi-Fi repeater (linked to router by Ethernet). * Old wired fuse consumer units still in service! # Modern consumer units RCDs etc. (or are they ECLBs? See Earthly Diversion and bottom of page. )
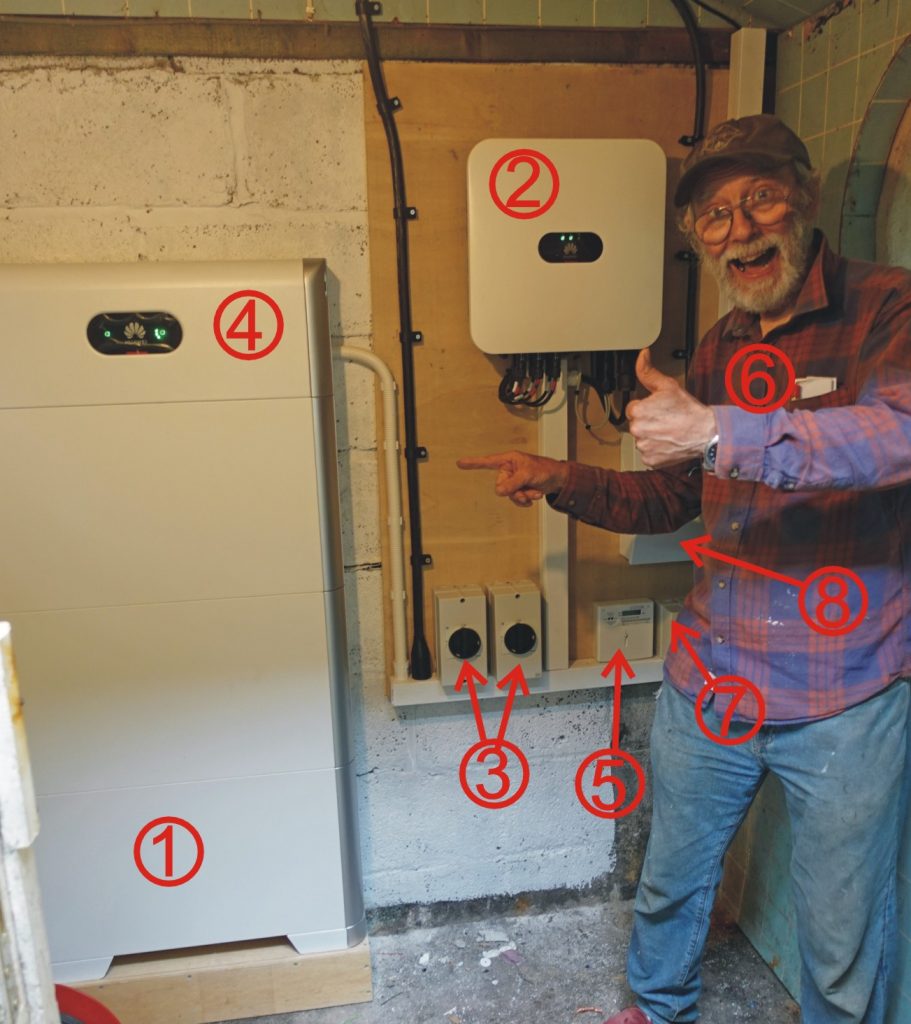
1. stack of three batteries. 2. Inverter. 3. DC isolation switches, one for each of the two strings of panels. 4. Battery electronics – there is a simple display to show the state of charge of the batteries. 5. Meter which measures power flows. 6. Idiot! 7. AC isolation switch (obscured by 6). 8. Various MCBs giving protection (obscured by 6 but shown in Gallery below).
Conclusions
The whole electrical installation went smoothly over a few days and everything seems to be working as it should. I would like to be able to have more control over the inverter which is the brains of the whole operation. Perhaps this will be possible in the future they say (I’m not holding my breath!) but at present I have to ask SunGift to make changes (remotely) to, say, the times the battery charges from the grid. Otherwise, there is a web page, supplied by Huawei, which displays useful details of how the system is performing. It also can show how much the house has consumed on a minute by minute basis and you get to ask what caused that spike at that particular time? You can see how much power the electric kettle consumes or compare the performance of the air fryer. We got pretty excited checking this out all the time at first but the novelty does tend to wear off after a bit!
As I conclude, the following day from my previous paragraphs, it is still winter, of course, end of January and a sunny day, the array is producing about 6kW of power and if it stays sunny this will last for about four hours (10am to 2pm) and probably peak at about 7kW. In the summer it will be much, much more (I hope!) To be exact, it is 10.30am and the sun is shining and the battery, with its overnight boost, is at 100% charge and 5.146 kW is going into the grid!
Gallery
Building the Cornish Rocker
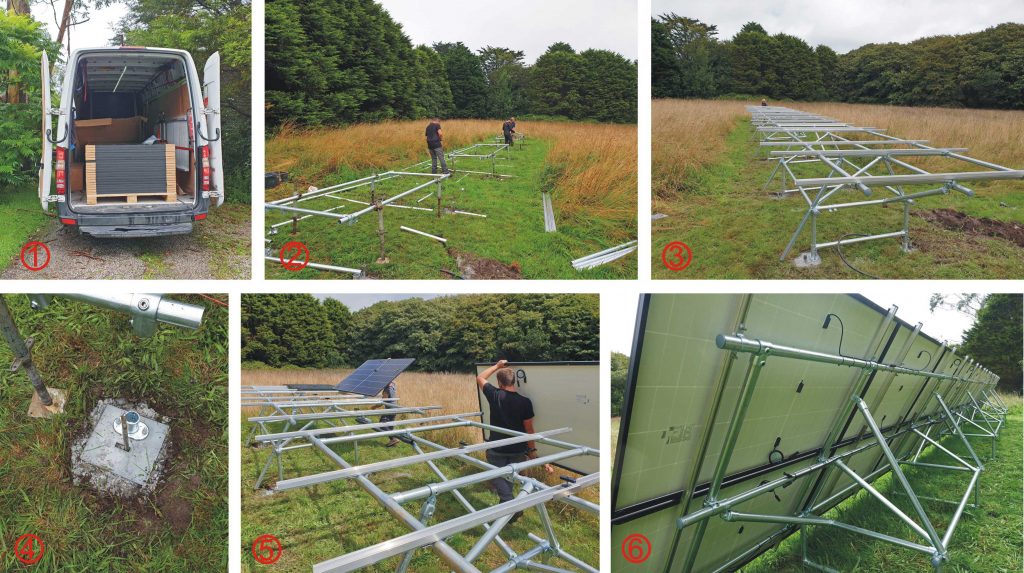
1. 20 panels in the back of a van. 2. Setting out the Cornish Rocker frame. 3. The complete frame ready for panels. 4. The Cornish Rocker anchor system – drill a hole put in a threaded rod and inject quick setting concrete. 5. Fitting the panels. 6. The completed system – it’s mostly made from standard aluminium scaffolding parts but has been nicely designed so that it is really easy to tilt to the required angle and lock into place. They send an email throughout the season to advise what the best angle is.
Cable drum
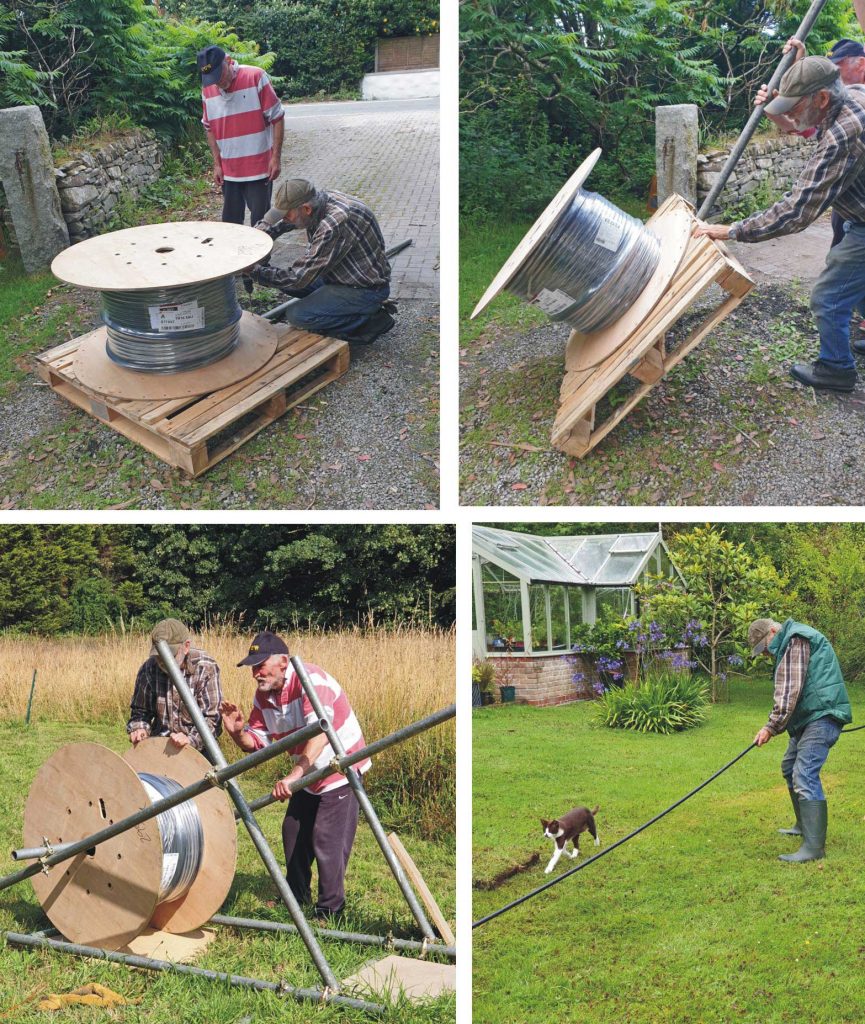
180 metres or so of cable is rather heavy and getting the drum up onto its edge for rolling without breaking the drum required it to be screwed to the pallet then a scaffold tube could be used to lever it upright. I put the cable drum on a scaffolding frame so the cable could be pulled out. It was reasonably hard work but the cat rushed ahead to clear any problems (that’s Sweetie doing her thing.)
Shed and Trellis (sounds like a pub)
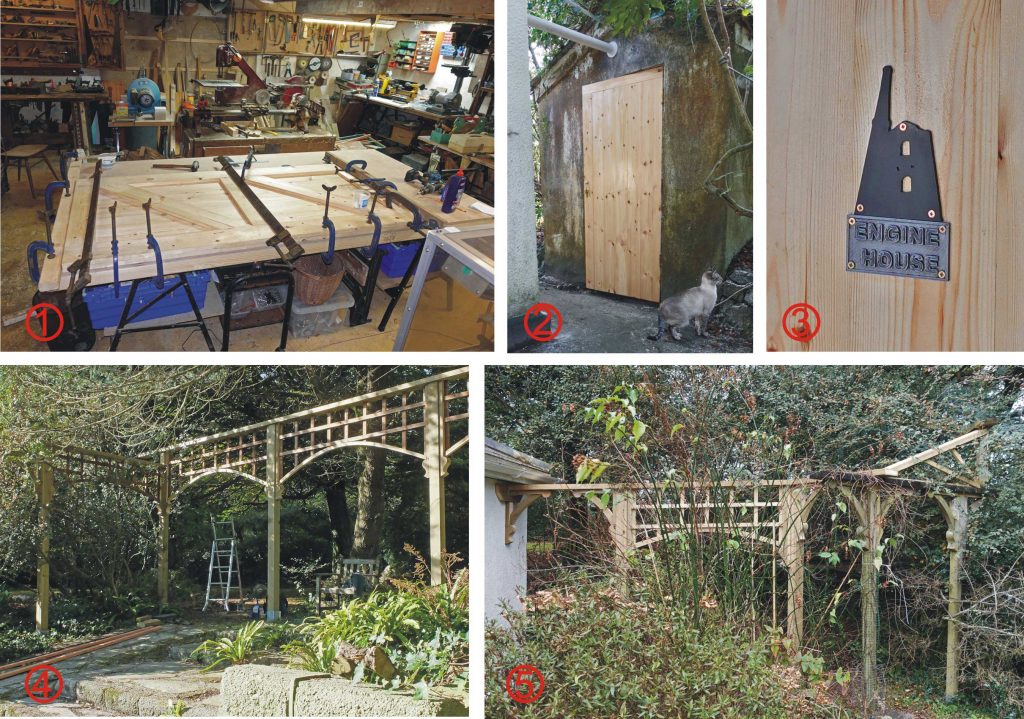
1. Making a new door for the shed (the old one was rotten). 2. The shed with its new door looking rather rustic. You can see the duct connecting it to the main building which I fitted. 3. Emblem I made for the door in keeping with our local heritage (laser-cut engine house and 3D-printed lettering. 4. and 5. Old and new trellis to carry the cable to the house.
System details
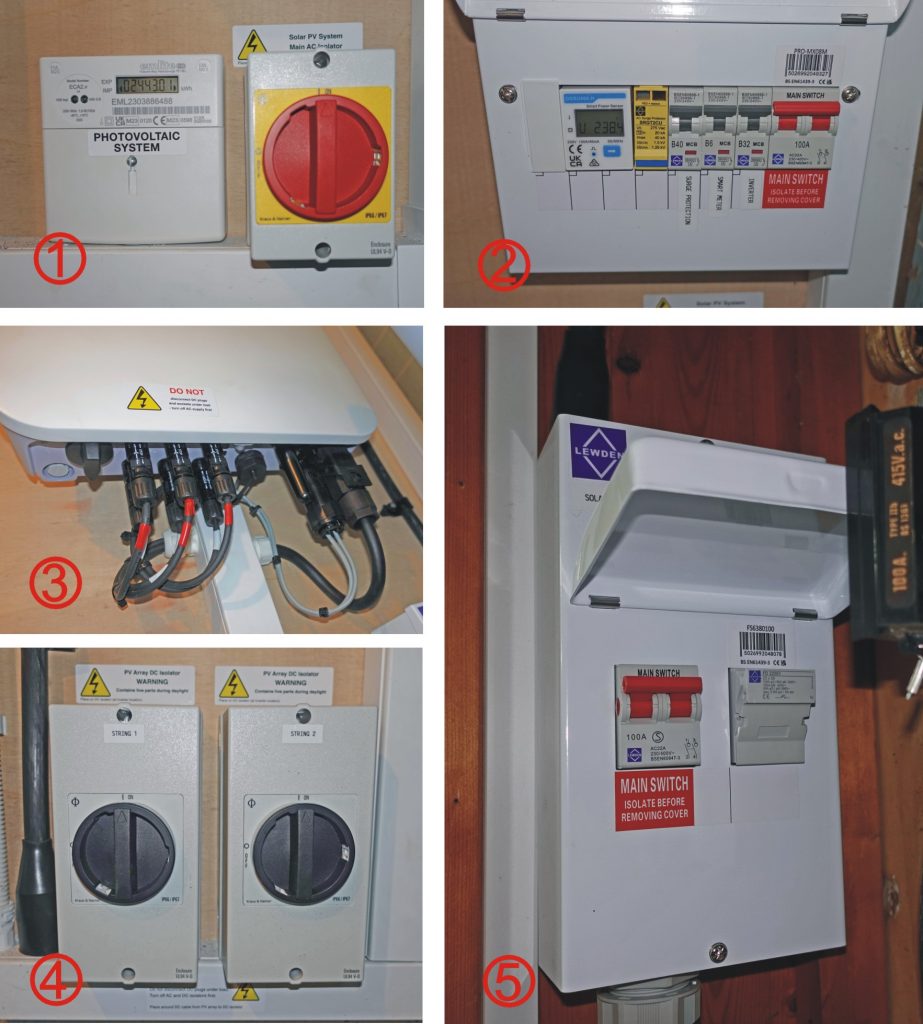
1. Power meter and AC isolation switch. 2. Various MCBs to protect the system. 3. The inverter needs a lot of connections – I wish I knew what they were all for! 4. DC isolation switches for the panels. 5. Hefty master cut out switch in the meter cupboard – the system has many switches (including one on the battery which I have not shown).
System schematic
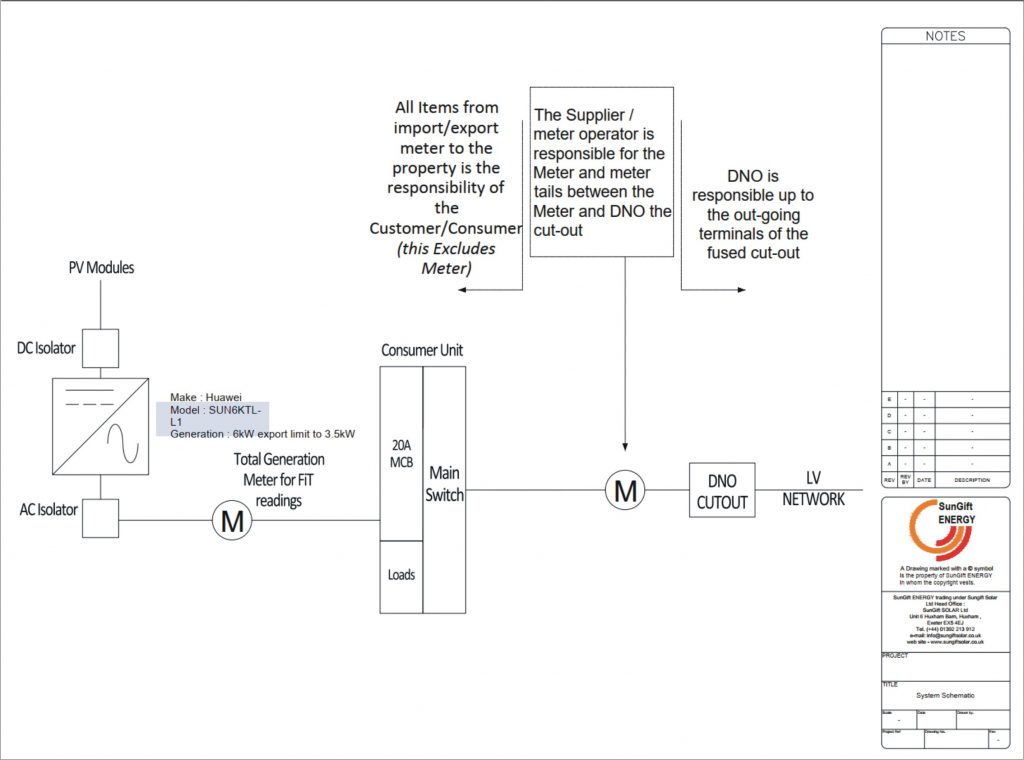
As supplied by SunGift. DC isolators are picture 4 above. AC isolator and total generation meter are picture 1 above. I assume the consumer unit in the schematic encompasses the units in pictures 2 and 5 (although neither has a 20A MCB!) I assume there are two switches/consumer units as the system is split between the shed (outside the house) amd the meter cupboard (inside the house). I have read that the electricity supplier (currently Octopus Energy) receives the feed in information fro its own meter, item 1 in the meter cupboard (it ain’t called “meter cupboard” for nothing!) not from the meter in the shed (shed picture 1 above).
DNO
DNO, by the way, stands for Distribution Network Operator. They are the company which owns the distribution netwok, pylons, wires etc. etc. In England the various DNOs are now merged into a company called The National Grid. You have to get a certificate from the DNO saying it’s OK to connect to the grid before your supplier (Octopus in our case) will give you any feed in cash. It can take some time to arrive!
Monitoring the system
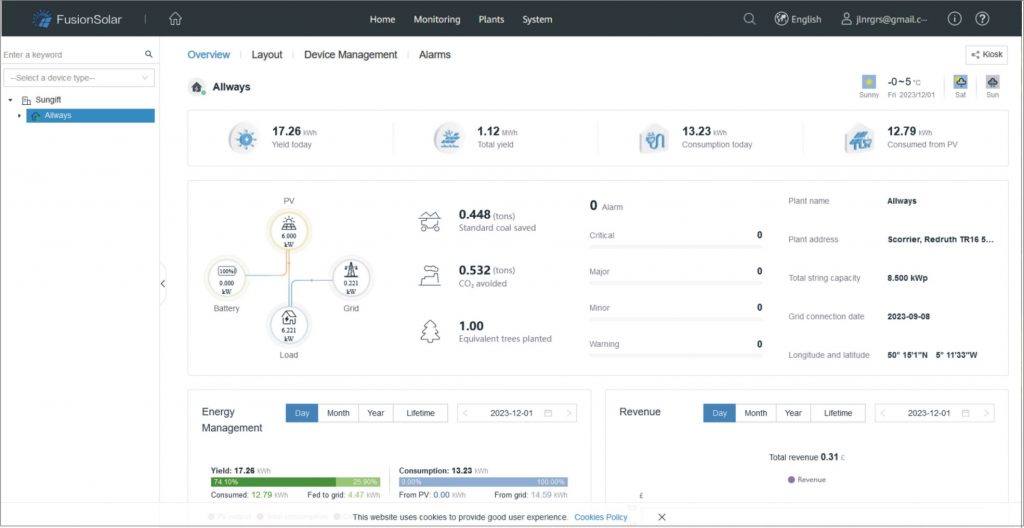
The Fusion Solar (Huawei) web page gives lots of current (no pun intended) and past information about the electrical system – output from the PVs, battery charge and discharge, consumption from the grid and feed in to the grid etc. You can analyse this on a minute by minute basis over the entire lifetime of the system. So you can pinpoint that brief moment when the sun broke through the clouds last Friday or exactly when you boiled the kettle for your morning cuppa today! The page sometimes gets its knickers in a twist and shows no data. This seems to be because the Wi-Fi connection to the inverter hangs. You can do an It Crowd reset by turning everything off and on again (numerous switches, must be in the right order!) or just leave it. Eventually it seems to reconnect with no loss of data.
Earthly diversion
One day I will make an effort to fix the theory of earth, earth leakage protection etc. and all its variations here and across the world. It’s like the meaning of existentialism. I look it up and the next day it’s completely gone. I do know that in the old days there used to be a spike in the actual ground (or connections to metal underground water pipes – all plastic now, so no use). As I understand it, The neutral pole at the electricity generator or substation is also similarly earthed. Most appliances had metal cases so if the live connection in the appliance somehow shorted to the case, the fuse would blow. Similarly, if the appliance, for example, got damp, a small current might flow to the earthed case but enough to trigger the earth leakage protection which detects an imbalance between the current in the live and neutral current flows.
These days, as I understand it (which may not mean a lot!) New installations connect the property’s earth to the neutral at the point the mains enters the property.
Anyway, we have an earth spike and several electricians have tested it and been satisfied. I also secretly add more earth spikes round the building on my belief that (rightly or wrongly) you can’t have too many! (Some wiring in this house dates back seventy or more years. Who knows what is happening under some floors and loft spaces? Over the years with the work I’ve done in the house, I’ve examined much of it and it seems OK. It’s all PVC except for the original earth cable which is
Vulcanised India Rubber (VIR) – used before the introduction of PVC.)
PS. Earthing equipment also can shield or protect equipment from the build up of static electrical charges of radio frequency interference.